Numenera in Roll20
Numenera in Roll20
Roll20 is a virtual tabletop running in your browser, to play your favorite Pen and Paper RPG online. Last summer I started running "Slaves of the Machine God" for Numenera using Roll20.
The character sheet for Numenera works very well, but I wanted to share some of the tools I made for me and my players.
The character sheet for Numenera works very well, but I wanted to share some of the tools I made for me and my players.
How to start out
 |
| Sample Token |
Roll20 has a built in voice function, but most people (me included) use a different Voice tool. Our group uses Discord. Make sure to install it, the browser-version doesn't work very well. Add a second voice channel, so you can move you and players there for private chats! We also use the textchannels of discord to chat, schedule games or to share links!
For creating tokens to use, I recommend TokenTool. I use the round tokens with the target acquired preset from TokenTool. You can use different Token Overlays for different factions, or to differentiate the same artwork. I use the same overlay for all my tokens, so everything will fit together nicely. For big enemy's i tend to just use artwork, and set this as a token, just so players see the size difference at a glance.
TokenTool allows you to open up a pdf of your choice and then select images in that pdf. Use this and your books for some generic NPCs and enemy art to use for your tokens. https://www.deviantart.com/ is also a good source for artworks. If you don't care about fancy art use this generic tokens.
Roll20 has a marketplace, and you can buy the Cypher Decks and Creature Decks for Numenera there. As far as i know, those are only cards in a carddeck, so you will not have tokens or charactersheets for the creatures.
I use roll able tables to give my players random cyphers, but it takes quit some time to set them up.
Create characters for your players, link up the token to the corresponding sheet and give your players control over there characters. Link up there token to there stats. I use red for might, green for speed and blue for intellect. Great thing about Roll20 sheets is, players just need to click the corresponding button on their sheet, and rolls to chat. Players can also post the description of abilities, skills, artifacts and cypher to chat with a simple click. The sheet works very well, but the weapons part is kind of useless. Use the attacks section for all your weapons. You can also choose between to ways to make rolls. "Roll Queries" brings up a prompt and asks for all inputs. "Action Section" adds a section on the character sheet, where you can put in difficulty, assets, effort etc. Both work, but i advise my players to use the "Action Section", because the action section remembers its input for your next roll, when you use Queries the will have to do the same prompt for every roll!
Making your own bestiary is also easy, but depending on how much enemies you want to add, can be a tedious process of copying and pasting. If you copy text from the pdfs I recommend you to paste the text once into your browsers adressbar and cut it again, then paste it into Roll20. This removes all line breaks for you, and makes it much easier to read! If you want to have your monsters ready to use, prepare a token for it, link that token to the character sheet.
I use the red bar for health, the green one for level and the blue one for armor. If the enemy in question is a goon who fights in hordes, then don't link up the health to the character-sheet. Just set the red bar to the appropriate health and make sure its linked to nothing. Now you can copy that token, and each of them will have separate health.
When you are adding monsters or characters, it's a good idea to add tags to them, so you can find them easily. I use tags to reference the source (for example: NWB1), the level (enemy5) and other things like organizations, city or area they belong to. If you like the use section of a enemy, add a tag like "randomIdea" and search for it when you need something quick. You can also use a Master Handout to get a overview of your enemies. Add a handout "Bestiary by Level". You can link to other handouts or characters within handouts. You just need to put the name of the handout or character in squared brackets. Here is my master handout for the bestiary (taken from the Ninth World Bestiary 3). You can just copy this into your handout, and if you create a new character with the responding name it will link it up!
You most likely also want to set up some journal entries for your players. For example a journal entry about there city, important organizations or neighboring states. I encourage my players with XP for writing a journal, about there adventures. Make a journal entry that everyone can edit, and let them write down there own diary. Good practice here is to have the most current entry on top, and the first entry at the bottom, otherwise you will have to scroll a lot after some adventures.
You can also use journal entries for Rules. You can link to other handouts or characters within handouts. You just need to put the name of the handout or character in squared brackets.
You can also use journal entries for Rules. You can link to other handouts or characters within handouts. You just need to put the name of the handout or character in squared brackets.
A great feature of Roll20 are battlemaps, you can set up the whole battlefield if you want to. If you prefer a more tactical combat, where exact position is key, you may want to use them. But I hardly use them for my encounters. I think the simple and streamlined combat, is what makes Numenera so much fun, and letting the players come up with details around the battlefield is much easier, if its only vaguely described. You can use your landing page for this kind of encounters, and draw out the rough shape of the battlefield with the drawing tools. You can also let your players draw up the battlefield, but beware of crudely shaped penises.
Instead of preparing cyphers and artifacts as handouts, i use roll able tables. I scavenged all the books i had, and ended up with a heap of items for my players. If you wanna make extensive use off long roll able tables, i recommend you to get a pro account, so you can import and export roll able tables.
Or you can install VTT Enhancment and use the table import feature from them. Its free so try it out!
I use this sheet to make my tables, and then export them into Roll20. There is also no way to format the output of the text in any way, but your players can copy pasta it directly from the Roll20 chat! Pro user can install the RecursiveTables API to remove the formatting of text from roll-able table and allow for markdown and inline-rolls in your text.
For music you can use the jukebox feature from Roll20. If you want to use music from YouTube or other music services use a discord-bot like FredBoat. If you want to use a soundboard or music from your PC you can use VoiceMeeter Banana, here is a video that explains how to use it!
Deciding what to use
Roll20 has ton of features, and can be very clunky at times. Always remember that you don't have to use this features if you don't need them. Don't adapt your game for Roll20, adapt Roll20 to your game. Numenera is a Theater of Mind game and often less is more. You can use Roll20 only for tracking stats and abilities without any fancy artworks. If Voice and Text worked just fine in your table-sessions, no need to change this for your online play. If you have your prepwork in physical form, don't put it all into Roll20, just look stuff up, like you would during a normal game. Some groups don't use the integrated diceroller, and roll dice on there end. Just try out what fits for you and your group!Your main playscreen or landing page
The landing page is the page where your sessions will start out, and if you don't use battlemaps you can use it as your main playing page.
Here is a template that you can use. I built it with Art from the Numenera Character Portfolio and the other Numenera books.

Make the page of your landing page bigger than it needs to be, and move currently unneeded art there. For example the map of a City your group is currently visiting. If the players want to have a closer look again, they just need to scroll down to see the map.
I think of my landing page as a whiteboard for me and my players, and i really want them to have currently important information in there view all the time. For example, if they are looking for someone called "Akke" and you don't want you players to ask you all the time, write it down in the main player area. If they encounter a NPC, put the Token in the play area (make sure that your players can see the nameplate). If you have a piece of artwork to supply your scene, drag it on the main play area. Other relevant Stuff that players should remember go into the notes are.
As i said before, i really don't like to use battlemaps for my encounters, and instead use the main play area of the landing page instead. I will just describe the surroundings to my players, and use tokens to keep track of Enemy's and NPCs.
If you like to use scene pictures, but don't want to constantly move Images from the gm-layer back and forth use a multi-sided token. Add a roll able table, and add your images. Its important that your images have all the same size, so the will be displayed correctly when the token is resized and images are changed. Use .png format with transparency so your Multi-Art Token fits nicely into the landing page. Include a empty page if you want your play-area to not show anything. Make a token from your table, resize it to fit your play page and move it to the map layer. To change the image, right click the token, and click multisided/choose side. If you add new images to the table, this token will not auto sync to your table, so you will need to spawn and position it again.
I also use the GM Layer for things i want to remember during the session. Just write down what you want to remember with the text tool on the GM-Layer and only the GM will be able to see it. You can also prepare tokens or artworks and add them here, when you want to use them, send them to the token-layer, so your players will see it. I also tend to store NPC tokens here, just to have easy access to often used NPCs.
Here is a template that you can use. I built it with Art from the Numenera Character Portfolio and the other Numenera books.

Make the page of your landing page bigger than it needs to be, and move currently unneeded art there. For example the map of a City your group is currently visiting. If the players want to have a closer look again, they just need to scroll down to see the map.
 |
| The different Areas explained |
As i said before, i really don't like to use battlemaps for my encounters, and instead use the main play area of the landing page instead. I will just describe the surroundings to my players, and use tokens to keep track of Enemy's and NPCs.
If you like to use scene pictures, but don't want to constantly move Images from the gm-layer back and forth use a multi-sided token. Add a roll able table, and add your images. Its important that your images have all the same size, so the will be displayed correctly when the token is resized and images are changed. Use .png format with transparency so your Multi-Art Token fits nicely into the landing page. Include a empty page if you want your play-area to not show anything. Make a token from your table, resize it to fit your play page and move it to the map layer. To change the image, right click the token, and click multisided/choose side. If you add new images to the table, this token will not auto sync to your table, so you will need to spawn and position it again.
I also use the GM Layer for things i want to remember during the session. Just write down what you want to remember with the text tool on the GM-Layer and only the GM will be able to see it. You can also prepare tokens or artworks and add them here, when you want to use them, send them to the token-layer, so your players will see it. I also tend to store NPC tokens here, just to have easy access to often used NPCs.
 |
| This is how it looks like during play |
Building a player menu
I use roll able tables to generate the loot for my players, but i also wanted to give them the opportunity to roll for the loot themselves. Crafting and Salvaging are also using lots of tables, so i decided to build a player menu, for all this things so the players can just click the macro, and get the result, without the need of rulebooks.
If you are creating macros, and want to use them in other games, its good practice to make a "macro" character, and add all your macros as abilities. That way you can export all your macros in one go.
If you don't want to spam the chat for your players use the /talktomyself command. I have it set up as a macro in my quickbar to quickly switch it on and off. Use it before you try out your macros, so only you can see the result. Great for testing out things.
Create a new character called player menu, and add abilities to the character sheet, that your game needs. A loot macro would roll from a table and then whisper it to the GM, so only the player and the gm know of the loot.
/me finds a Cypher
/w gm &{template:default} {{name=A random Cypher}}{{[[1t[cypher]]]}}
If you have loot that the players have to identify first, this will not work, because the gm and the player can see the rolls. If you have a Pro Account you can use the blindroll script, so your players cannot see the result of the roll.
/me finds a Artifact
!broll 1t[Artifact]
Blindroll is very useful if you want your players to roll, but only you can see the result
Otherwise you as a GM will need to roll for it.
If you build different macros for your different tables you can build a clickable chat-menu. More about chat menus.
/w gm &{template:default} {{name=Crafting}} {{[RandomSalvageResult](! #randomsalvage)
[IotiumMenu](! #iotum-menu )
[IotiumDiscoveryTable](! #iotiumresult)
[PlanSeed](! #planseed)
[MinorSecondaryEffect](! #craft-minorsecond)
[MajorSecondaryEffect](! #craft-majorsecond)
[CraftingIntrusion](! #craft-intrusion)
}}
This is my crafting Menu, if the player clicks on one of the options, it executes the corresponding macro, which you need to setup first. These macros can also contain new menus, so the IotiumMenu option would bring up another menu, where you can select the level.
Sometimes you need to roll something other than a D20. You can use the chat menu for all rolls, but you can also use this Macro for a prompt to select the dice:
&{template:default}{{name=Rolling ?{How Many Dice?}d?{Type to roll? (d2/d3/d4/d6/d8/d10/d12/d20/d100) |2|3|4|6|8|10|12|20|100}+?{Bonus?|0} for ?{Reason?|Test}}} {{Result=[[?{How Many Dice?}d?{Type to roll? (d2/d3/d4/d6/d8/d10/d12/d20/d100) |2|3|4|6|8|10|12|20|100}+?{Bonus?}]]}}
If you got a lot of whispering going on in your group, add a whisper to gm macro:
/w gm ?{Message}
While your at it, if you want to whisper a lot, add the same for your players. This macro lets you click on a token, and whisper to the player controlling that token.
/w @{target|token_name} ?{Message}
Have a lot of math going on? Use this calculator macro:
**=** [[?{Calculator}]]
If you have a pro subscription and want to give your players a simple way to use the Special effects, try this macro:
/fx ?{Type|Beam,beam|Bomb,bomb|Breath,breath|Bubbling,bubbling|Burn,burn|Burst,burst|Explosion,explode|Glow,glow|Missile,missile|Nova,nova|Spatter,splatter}-?{Color|Acid,acid|Blood,blood|Charm,charm|Death,death|Fire,fire|Frost,frost|Holy,holy|Magic,magic|Slime,slime|Smoke,smoke|Water,water} @{target|Source|token_id} @{target|Destination|token_id}

Create a suitable token (I choose a pile of shin) and set it as the standard token for the player menu sheet. Make sure all your players have control over the token and can roll from the tables you created, or they will not be able to use it.
My players share there money, so I linked on of the bars of the player menus token to the money stat of that character sheet. Players can always see how much money they have in bank, and can easily add and subtract group money if the need arises. This works well with other shared resources your game might have.
If you are creating macros, and want to use them in other games, its good practice to make a "macro" character, and add all your macros as abilities. That way you can export all your macros in one go.
If you don't want to spam the chat for your players use the /talktomyself command. I have it set up as a macro in my quickbar to quickly switch it on and off. Use it before you try out your macros, so only you can see the result. Great for testing out things.
Create a new character called player menu, and add abilities to the character sheet, that your game needs. A loot macro would roll from a table and then whisper it to the GM, so only the player and the gm know of the loot.
If you have loot that the players have to identify first, this will not work, because the gm and the player can see the rolls. If you have a Pro Account you can use the blindroll script, so your players cannot see the result of the roll.
Blindroll is very useful if you want your players to roll, but only you can see the result
Otherwise you as a GM will need to roll for it.
If you got a lot of whispering going on in your group, add a whisper to gm macro:
While your at it, if you want to whisper a lot, add the same for your players. This macro lets you click on a token, and whisper to the player controlling that token.

A player menu is great for macros that all players can use, if you want a macro for one specific player, add it as a ability on there sheet, and activate it as a token action. This is great for things that need a selected token to work, for example initiative. If your players keep forgetting to click there token before initiative use this:
/me rolls initiative
&{template:default}{{name=@{selected|token_name}s Initiative}}{{Value=[[1d20+?{Training or Assets|0|1|2|3|4}*3+?{Effort|0|1|2|3|4|5|6}+3&{tracker}]]}}{{Effort ([[?{Effort|0|1|2|3|4|5|6}]] levels) cost=[[(?{Effort|0|1|2|3|4|5|6}*2+1)-@{selected|speed_edge}]] points}}{{eased by=[[?{Training or Assets|1|2|3|4}+?{Training or Assets|0|1|2|3|4}]] steps}}
This will bring up a prompt, and ask by how many levels this task is eased, roll a d20, add the bonus times 3 to their roll and add this value to the turntracker! You will also get a nice chat-output to show your players how much effort costs for them.
Here is a macro for combat between players:
/me tries to ?{What do you do?} @{target|token_name}
&{template:default}{{name=?{Who are you?|Player 1|Player 2|Player 3|Player 4|Player 5} vs. @{target|token_name} }}{{Value to beat=[[1d20+?{Training or Assets|0|1|2|3|4}*3+?{Effort|0|1|2|3|4|5|6}*3]]}}{{Spent Effort=[[?{Effort|0|1|2|3|4|5|6}]] levels}} {{Training or Assets=[[?{Training or Assets|1|2|3|4}]] steps}}
This asks for a target, reason, the one who acts as well as amount of modifications and puts the roll to char. Just change Player 1 etc. with your player-characters names.
Building a simple Random NPC generator
If we combine roll able tables with a custom sheet and multi-sided tokens, we can build a random NPC generator. We are gonna need some tokens with some art, the more the better. I just used token tools, scrolled to all my pdfs with art that was fitting for the setting and made lots of portrait tokens. Add all of them to a roll able table. You can then spawn a token from that table. If you right-click that token you can see the multi sided option, choose random side to generate a random portrait. If you don't want that this roll is posted to chat use /talktomyself command. I have it set up as a macro in my quickbar to quickly switch it on and off.Now make a new character named "Random NPC", this character will be our stand-in for our token actions. Set your multi-sided token as standard token for the random NPC. You will most likely need a name for your NPC, so we add a roll able table with names. Then we will add a ability to our "Random NPC" character to roll from the names table and whisper it to the gm:
/w gm &{template:default} {{name=A random Name}} {{[[1t[Names]]]}}
If we combine different tables we can also create names including surnames, second names or nicknames.
/w gm &{template:default} {{name=A random long Name}} {{Male:[[1t[names-male]]] Female:[[1t[names-female]]] "[[1t[names-nickname]]]" [[1t[names-surname]]]}}
Set it as a token action, and repeat this process with other things you wanna randomly generate, like personality, something strange about them, Gm-Intrusions or any other thing you can find a suitable table for. Keep it on the GM layer until you need it, and a new NPC is just some clicks away. Remember to set the nametag for your token accordingly and make sure your players can see the name tag! Here is a link with exotic names and here for a list of public tables!
Bonus points if you remove every used token from the roll able table, so all your NPC's are unique.
Building a GM-Menu
Same thing as the player menu, but only you have control over the token. I use this for tables i want to have quick access to, like Names or cyphers for my NPC's. "Injecting the Weird" from Monte Cook has great tables for weird things in the world of Numenera to give me some inspiration or ideas. The GM-Intrusion Deck could also be handy, if you are bad at coming up with Intrusions. Just make sure to whisper your output to gm, so your players won't see it in chat.
You can also add macros to your macroquickbar, if you don't want to click your gm token all the time!
If you don't have a second monitor, or just want to have important information about your NPC easily accessible, u can use this:
/w gm &{template:default} {{name=@{target|token_name}}}{{@{target|npcdescription}}}
It will ask you to select a token, and will whisper its description as written in its linked character sheet to yourself. You can use this for all other attributes of your creates as well. You can also add additional attributes to your NPC-sheets for extra things you wanna keep track of. I use this for the combat/character description and GM Intrusions.
If you are running a text-only game, or you or your players constantly forget the difficulty of a given task, you can use this:
/desc @{target|token_name} has to make a ?{What kind of check?} check! This is a ?{Which Stat?|Speed,Speed|Intellect,Intellect|Might,Might} Task against Level [[?{Which Level?}]].
This lets you select a token, the kind of task, which stat to use and which level that task has!
Same concept but for NPC attacks, use this in your macro bar, select the NPC that attacks, click the macro button then select the target player.
/emas @{selected|token_name} attacks @{target|token_name}!
/desc @{target|token_name} makes a ?{Which Defense?|Speed,Speed|Intellect,Intellect|Might,Might} Defense against Level [[?{Level}]]!
If you name your player-menu token something like "the whole group", and click it with the Macros from above, you can make a call for the whole group to make rolls!
To quickly add Initiative-values use this in your macro bar, and select the token that needs a turn and initiative. If the token doesn't has a turn yet, it will get one with this macro, so you don't need to add a turn first. It will ask for the Level, multiply it by 3 and set this value in the turntracker!
/gr [[?{Level for Initiative}*3]] &{tracker}
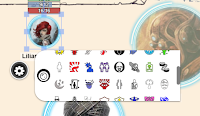 A new feature of Roll20 is that you can set your own token markers, little symbols you can add to your token to keep track of status effects. Not really necessary but what's really cool about them, is that your players can hover over the different Icons, and see the description of the effect. My custom token markers, i used game-icons.net/ to create them.
&{template:cyphsys} {{sheetstyle=@{the group|sheet_style}}} {{fontstyle=@{the group|sheet_font_easy}}} {{charname=@{the group|character_name}}} {{charid=@{the group|character_id}}} {{name=Name of your header}} {{description=The Description of your text}}
You can always use the default template, but if you want your chat-formation in the same style as the rolls from your sheet, this is the way to go. This comes in handy with long texts, because the roll template comes with a fixed sized, and lets you scroll in it.
Shift+Hold down left mouse button - forces player view to the point you are pinging
Shift+Double click - Opens up the character page of a token
Alt+Double click - Opens up the character sheet of a token
Shift+z - Show zoom view of selected graphic to all players
You can find more shortcuts here!
Stupid Roll20 TricksYou can also add macros to your macroquickbar, if you don't want to click your gm token all the time!
If you don't have a second monitor, or just want to have important information about your NPC easily accessible, u can use this:
/w gm &{template:default} {{name=@{target|token_name}}}{{@{target|npcdescription}}}
It will ask you to select a token, and will whisper its description as written in its linked character sheet to yourself. You can use this for all other attributes of your creates as well. You can also add additional attributes to your NPC-sheets for extra things you wanna keep track of. I use this for the combat/character description and GM Intrusions.
If you are running a text-only game, or you or your players constantly forget the difficulty of a given task, you can use this:
/desc @{target|token_name} has to make a ?{What kind of check?} check! This is a ?{Which Stat?|Speed,Speed|Intellect,Intellect|Might,Might} Task against Level [[?{Which Level?}]].
This lets you select a token, the kind of task, which stat to use and which level that task has!
Same concept but for NPC attacks, use this in your macro bar, select the NPC that attacks, click the macro button then select the target player.
/emas @{selected|token_name} attacks @{target|token_name}!
/desc @{target|token_name} makes a ?{Which Defense?|Speed,Speed|Intellect,Intellect|Might,Might} Defense against Level [[?{Level}]]!
If you name your player-menu token something like "the whole group", and click it with the Macros from above, you can make a call for the whole group to make rolls!
To quickly add Initiative-values use this in your macro bar, and select the token that needs a turn and initiative. If the token doesn't has a turn yet, it will get one with this macro, so you don't need to add a turn first. It will ask for the Level, multiply it by 3 and set this value in the turntracker!
/gr [[?{Level for Initiative}*3]] &{tracker}
Custom Token Markers
 A new feature of Roll20 is that you can set your own token markers, little symbols you can add to your token to keep track of status effects. Not really necessary but what's really cool about them, is that your players can hover over the different Icons, and see the description of the effect. My custom token markers, i used game-icons.net/ to create them.
Using the cypher template
Instead of using the default template for your outputs you can use the template of the cypher sheet. The template is always linked to a specific character, and whoever uses the template must have control over the character it references to, to work correctly. Remember your player-menu/macros character? We can use this stand-in characters for the template. Choose the style you want to use for the template on the character-sheet. If your player-menu is called "the group" the template looks like this:&{template:cyphsys} {{sheetstyle=@{the group|sheet_style}}} {{fontstyle=@{the group|sheet_font_easy}}} {{charname=@{the group|character_name}}} {{charid=@{the group|character_id}}} {{name=Name of your header}} {{description=The Description of your text}}
You can always use the default template, but if you want your chat-formation in the same style as the rolls from your sheet, this is the way to go. This comes in handy with long texts, because the roll template comes with a fixed sized, and lets you scroll in it.
Important Shortcuts:
Activate advanced shortcuts in your options. Commands I frequently use are:Shift+Hold down left mouse button - forces player view to the point you are pinging
Shift+Double click - Opens up the character page of a token
Alt+Double click - Opens up the character sheet of a token
Shift+z - Show zoom view of selected graphic to all players
You can find more shortcuts here!
Additional Resources:
VTT Enhancment - Enhances Roll20 functions, adds non-pro import for roll able tables
Roll20 Crashcourse


Kommentare
Kommentar veröffentlichen